「ESRI シェープファイル」の版間の差分
細 (ページ ESRI Shapefiles を ESRI シェープファイル へ移動) |
(Figure差込で一旦保存) |
||
| 行1: | 行1: | ||
| − | + | ==ESRI シェープファイル== | |
| − | ESRI | + | |
| − | + | ||
| − | |||
The standard vector file format used in QGIS is the ESRI Shapefile. Support | The standard vector file format used in QGIS is the ESRI Shapefile. Support | ||
is provided by the OGR Simple Feature Library( http://www.gdal.org/ogr/ ). A shapefile actually consists of several files. The following three are required: | is provided by the OGR Simple Feature Library( http://www.gdal.org/ogr/ ). A shapefile actually consists of several files. The following three are required: | ||
| − | + | *.shp file containing the feature geometries. | |
| + | *.dbf file containing the attributes in dBase format. | ||
| + | *.shx index file. | ||
| − | |||
| − | |||
| − | |||
| − | |||
| − | |||
| − | |||
| − | |||
| − | |||
| − | |||
| − | |||
Shapefiles also can include a file with a .prj suffix, which contains | Shapefiles also can include a file with a .prj suffix, which contains | ||
the projection information. While it is very useful to have a projection file, it is not mandatory. A shapefile dataset can contain additional files. For further details see the ESRI technical specification at http://www.esri.com/library/whitepapers/pdfs/shapefile.pdf . | the projection information. While it is very useful to have a projection file, it is not mandatory. A shapefile dataset can contain additional files. For further details see the ESRI technical specification at http://www.esri.com/library/whitepapers/pdfs/shapefile.pdf . | ||
. | . | ||
| − | + | ===Loading a Shapefile=== | |
| − | + | ||
| + | [[ファイル:MActionAddNonDbLayer.png]] To load a shapefile, start | ||
| + | QGIS and click on the {{Template:ToolBtnTwo|MActionAddNonDbLayer|Add a vector layer}} | ||
| + | toolbar button or simply type {{Template:KeyStroke|V}}. | ||
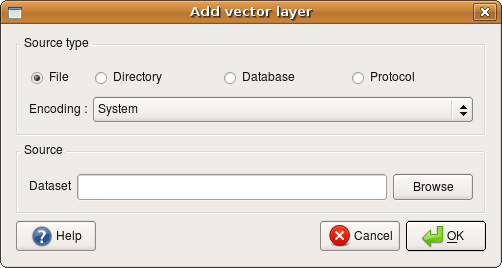
| + | This will bring up a new window (see Figure[[#Figure 5|5]]). | ||
| − | |||
| − | |||
| − | |||
| − | |||
| − | |||
| − | |||
| − | |||
| − | |||
| − | |||
| − | |||
| − | |||
| − | |||
| − | |||
| − | |||
| − | |||
| − | |||
| − | |||
| − | |||
| − | |||
| − | |||
| − | |||
| − | |||
| − | |||
| − | |||
| − | |||
| − | |||
| − | |||
| − | |||
| − | |||
| − | |||
| − | |||
| − | |||
| − | |||
| − | |||
| − | |||
| − | |||
| − | |||
| − | |||
| − | |||
| − | |||
| − | |||
| − | |||
| − | |||
| − | |||
| − | |||
| − | |||
| − | |||
| − | |||
| − | |||
| − | |||
| − | |||
| − | |||
| − | |||
| − | |||
| − | |||
| − | |||
| − | |||
| − | |||
| − | |||
From the available options check File. Click on Browse. | From the available options check File. Click on Browse. | ||
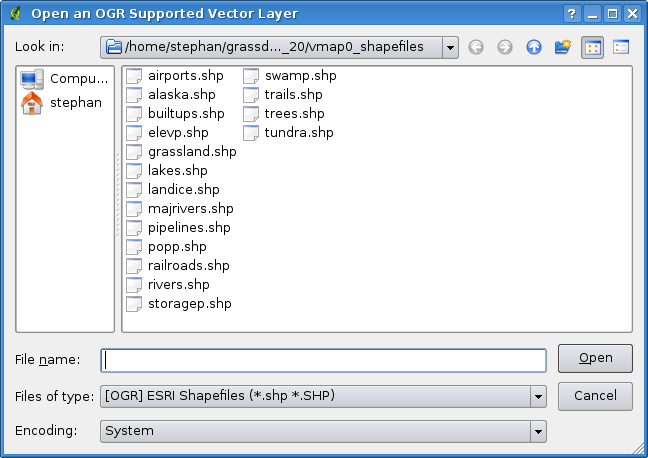
| − | That will bring up a standard open file dialog (see Figure | + | That will bring up a standard open file dialog (see Figure |
| − | + | [[#Figure 6|6]]) which allows you to navigate the file system and load | |
a shapefile or other supported data source. | a shapefile or other supported data source. | ||
The selection box Files of type... allows you to preselect some OGR supported file formats. | The selection box Files of type... allows you to preselect some OGR supported file formats. | ||
| − | + | {{Template:Figure|num=5|caption=Add Vector Layer Dialog|fname=Addvectorlayerdialog}} | |
| + | |||
You can also select the Encoding type for the shapefile if desired. | You can also select the Encoding type for the shapefile if desired. | ||
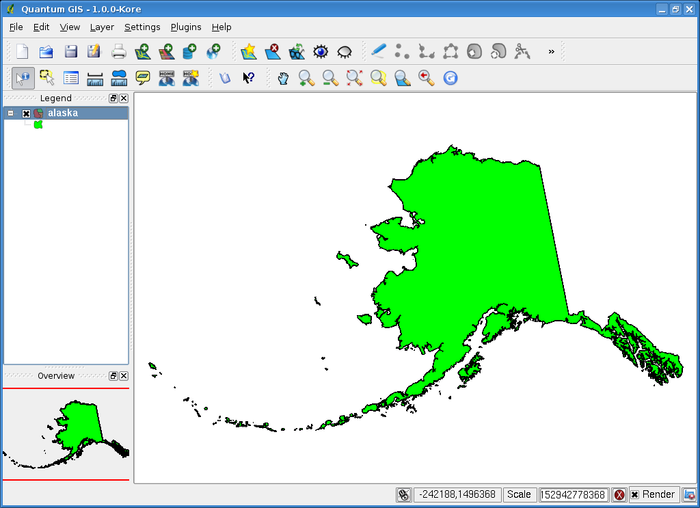
| − | + | Selecting a shapefile from the list and clicking Open loads it into QGIS. Figure | |
| − | Selecting a shapefile from the list and clicking Open loads it into QGIS. Figure | + | [[#Figure 7|7]] shows QGIS after loading the alaska.shp file. |
| − | + | ||
| − | |||
| − | |||
| − | |||
| − | |||
| − | |||
Once loaded, you can zoom around the shapefile using the map navigation tools. | Once loaded, you can zoom around the shapefile using the map navigation tools. | ||
To change the symbology of a layer, open the Layer Properties dialog by double | To change the symbology of a layer, open the Layer Properties dialog by double | ||
| 行111: | 行39: | ||
vector layers. | vector layers. | ||
| − | + | ===Improving Performance=== | |
| − | + | ||
| − | |||
| − | |||
| − | |||
| − | |||
| − | |||
To improve the performance of drawing a shapefile, you can create a spatial | To improve the performance of drawing a shapefile, you can create a spatial | ||
index. A <A NAME="81"></A> spatial index will improve the | index. A <A NAME="81"></A> spatial index will improve the | ||
| 行124: | 行46: | ||
.qix extension. | .qix extension. | ||
| − | |||
Use these steps to create the index: | Use these steps to create the index: | ||
| − | + | *Load a shapefile. | |
| − | + | *Open the Layer Properties dialog by double-clicking on the | |
| − | + | ||
| − | + | ||
| − | + | ||
| − | + | ||
shapefile name in the legend or by right-clicking and choosing | shapefile name in the legend or by right-clicking and choosing | ||
Properties from the popup menu. | Properties from the popup menu. | ||
| − | + | {{Template:Figure|num=6|caption=Open an OGR Supported Vector Layer Dialog|fname=Shapefileopendialog}} | |
| − | + | *In the tab General click the Create Spatial Index button. | |
| − | + | ||
| − | + | ||
| + | ===Loading a MapInfo Layer=== | ||
| − | |||
| − | |||
| − | |||
| − | |||
| − | |||
To load a MapInfo layer, click on the | To load a MapInfo layer, click on the | ||
mActionAddNonDbLayerAdd a vector layer | mActionAddNonDbLayerAdd a vector layer | ||
| 行151: | 行62: | ||
Files of Type[OGR] MapInfo (*.mif *.tab *.MIF *.TAB) and select the layer you want to load. | Files of Type[OGR] MapInfo (*.mif *.tab *.MIF *.TAB) and select the layer you want to load. | ||
| − | + | ===Loading an ArcInfo Binary Coverage=== | |
| − | + | ||
| − | |||
| − | |||
| − | |||
| − | |||
| − | |||
| − | |||
To load an ArcInfo binary coverage click on the | To load an ArcInfo binary coverage click on the | ||
mActionAddNonDbLayerAdd a vector layer | mActionAddNonDbLayerAdd a vector layer | ||
| 行166: | 行70: | ||
Navigate to the directory that contains the coverage files and select it. | Navigate to the directory that contains the coverage files and select it. | ||
| − | + | {{Template:Figure|num=7|caption=QGIS with Shapefile of Alaska loaded|fname=Shapefileloaded|width=700px}} | |
| + | |||
Similarly, you can load directory based vector files in the UK National Transfer Format as well as the | Similarly, you can load directory based vector files in the UK National Transfer Format as well as the | ||
raw TIGER Format of the US Census Bureau. | raw TIGER Format of the US Census Bureau. | ||
| − | |||
| − | |||
| − | |||
2009年9月8日 (火) 02:06時点における版
目次
ESRI シェープファイル
The standard vector file format used in QGIS is the ESRI Shapefile. Support is provided by the OGR Simple Feature Library( http://www.gdal.org/ogr/ ). A shapefile actually consists of several files. The following three are required:
- .shp file containing the feature geometries.
- .dbf file containing the attributes in dBase format.
- .shx index file.
Shapefiles also can include a file with a .prj suffix, which contains the projection information. While it is very useful to have a projection file, it is not mandatory. A shapefile dataset can contain additional files. For further details see the ESRI technical specification at http://www.esri.com/library/whitepapers/pdfs/shapefile.pdf . .
Loading a Shapefile
![]() To load a shapefile, start
QGIS and click on the
To load a shapefile, start
QGIS and click on the ![]() Add a vector layer
toolbar button or simply type V.
This will bring up a new window (see Figure5).
Add a vector layer
toolbar button or simply type V.
This will bring up a new window (see Figure5).
From the available options check File. Click on Browse. That will bring up a standard open file dialog (see Figure 6) which allows you to navigate the file system and load a shapefile or other supported data source. The selection box Files of type... allows you to preselect some OGR supported file formats.
| 図 5: Add Vector Layer Dialog |
 |
You can also select the Encoding type for the shapefile if desired.
Selecting a shapefile from the list and clicking Open loads it into QGIS. Figure 7 shows QGIS after loading the alaska.shp file.
Once loaded, you can zoom around the shapefile using the map navigation tools. To change the symbology of a layer, open the Layer Properties dialog by double clicking on the layer name or by right-clicking on the name in the legend and choosing Properties from the popup menu. See Section <A HREF="node17.html#sec:symbology">5.4.2</A> for more information on setting symbology of vector layers.
Improving Performance
To improve the performance of drawing a shapefile, you can create a spatial index. A <A NAME="81"></A> spatial index will improve the speed of both zooming and panning. Spatial indexes used by QGIS have a .qix extension.
Use these steps to create the index:
- Load a shapefile.
- Open the Layer Properties dialog by double-clicking on the
shapefile name in the legend or by right-clicking and choosing Properties from the popup menu.
| 図 6: Open an OGR Supported Vector Layer Dialog |
 |
- In the tab General click the Create Spatial Index button.
Loading a MapInfo Layer
To load a MapInfo layer, click on the mActionAddNonDbLayerAdd a vector layer toolbar bar button or type V, change the file type filter to Files of Type[OGR] MapInfo (*.mif *.tab *.MIF *.TAB) and select the layer you want to load.
Loading an ArcInfo Binary Coverage
To load an ArcInfo binary coverage click on the mActionAddNonDbLayerAdd a vector layer toolbar button or type V to open the Add Vector Layer dialog. Select Directory. Change to TypeArc/Ingo Binary Coverage. Navigate to the directory that contains the coverage files and select it.
| 図 7: QGIS with Shapefile of Alaska loaded |
 |
Similarly, you can load directory based vector files in the UK National Transfer Format as well as the
raw TIGER Format of the US Census Bureau.