「Plugins mapserver export」の版間の差分
(ページの作成: <H2> MapServer Export Plugin </H2> <P> You can use QGIS to ``compose'' your map by adding and arranging layers, symbolizing them, customizing the colors and then creating a map…) |
(→MapServer Export Plugin) |
||
| (同じ利用者による、間の2版が非表示) | |||
| 行1: | 行1: | ||
| − | + | === MapServer Export Plugin === | |
| − | MapServer Export Plugin | + | <span id='sec:mapserver_export'></span> |
| − | </ | + | |
| − | + | You can use QGIS to "compose" your map by adding and arranging layers, | |
| − | You can use QGIS to | + | |
symbolizing them, customizing the colors and then creating a map file | symbolizing them, customizing the colors and then creating a map file | ||
for MapServer. | for MapServer. | ||
| − | + | ==== Creating the Project File ==== | |
| − | + | ||
| − | + | ||
| − | + | ||
| − | < | + | The MapServer Export Plugin operates on a saved QGIS project file and |
| − | < | + | '''not''' on the current contents of the map canvas and legend. This |
| − | < | + | has been a source of confusion for a number of users. As described below, |
| − | < | + | before you start using the MapServer Export Plugin, you need to arrange |
| − | </ | + | the raster and vector layers you want to use in MapServer and save this |
| − | < | + | status in a QGIS project file. |
| − | < | + | |
| + | <table align='center'> | ||
| + | <caption>'''図 56:''' Arrange raster and vector layers for QGIS project file {{Template:Nix}}</caption> | ||
| + | <tr><td> | ||
| + | <span id='fig:mapserver_export_qgs'></span> | ||
| + | [[File:mapserver_export_qgis.png|454px]]</td></tr></table> | ||
| + | |||
| + | In this example, we demonstrate the four steps required to create a simple | ||
| + | project file which can be used to create the MapServer map file. | ||
| + | We use raster and vector files from the QGIS sample dataset [[label_sampledata]]. | ||
| + | |||
| + | <ol> | ||
| + | <li>Add the raster layer {{Template:FileName|landcover.tif}} clicking on the | ||
| + | {{Template:ToolBtnTwo|mActionAddRasterLayer|Add Raster Layer}} icon. | ||
| + | <li>Add the vector Shapefiles {{Template:FileName|lakes.shp, majrivers.shp}} and | ||
| + | {{Template:FileName|airports.shp}} from the QGIS sample dataset clicking on the | ||
| + | {{Template:ToolBtnTwo|mActionAddNonDbLayer|Add Vector Layer}} icon. | ||
| + | <li>Change the colors and symbolize the data as you like (For example see | ||
| + | Figure [[#fig:mapserver_export_qgis|57]]) | ||
| + | <li>Save a new project named {{Template:FileName|mapserverproject.qgs}} using | ||
| + | {{Template:MainMenuOpt|File}} > {{Template:DropMenuOptTwo|mActionFileSave|Save Project}}. | ||
| + | </ol> | ||
| + | |||
| + | ==== Creating the Map File ==== | ||
| + | |||
| + | The tool {{Template:FileName|msexport}} to export a QGIS project file to a MapServer map | ||
| + | file is installed in your QGIS binary directory and can be used independently of QGIS. | ||
| + | To use it from within QGIS, you need to enable the MapServer Export Plugin first using the Plugin Manager (see Section [[sec:load_core_plugin]]). | ||
| + | |||
| + | <table align='center'> | ||
| + | <caption>'''図 57:''' Export to MapServer Dialog {{Template:Nix}}</caption> | ||
| + | <tr><td> | ||
| + | <span id='fig:mapserver_export_dialog'></span> | ||
| + | [[File:mapserver_export_dialog.png|340px]]</td></tr></table> | ||
| + | |||
| + | <dl> | ||
| + | <dt>Map file<dd>Enter the name for the map file to be created. You can use the button at the right to browse for the directory where you want the map file created. | ||
| + | <dt>Qgis project file<dd>Enter the full path to the QGIS project file (.qgs) you want to export. You can use the button at the right to browse for the QGIS project file. | ||
| + | <dt>Map Name<dd>A name for the map. This name is prefixed to all images generated by the mapserver. | ||
| + | <dt>Map Width<dd>Width of the output image in pixels. | ||
| + | <dt>Map Height<dd>Height of the output image in pixels. | ||
| + | <dt>Map Units<dd>Units of measure used for output | ||
| + | <dt>Image type<dd>Format for the output image generated by MapServer | ||
| + | <dt>Web Template<dd>Full path to the MapServer template file to be used with the map file | ||
| + | <dt>Web Header<dd>Full path to the MapServer header file to be used with the map file | ||
| + | <dt>Web Footer<dd>Full path to the MapServer footer file to be used with the map file | ||
| + | </dl> | ||
| + | |||
| + | Only the {{Template:FileName|Map file}} and {{Template:FileName|QGIS project file}} inputs are | ||
| + | required to create a map file, however by omitting the other parameters, | ||
| + | you may end up creating a non-functional map file, depending on your intended use. | ||
| + | Although QGIS is good at creating a map file from your project file, | ||
| + | it may require some tweaking to get the results you want. | ||
| + | For this example, we will create a map file using the project file | ||
| + | {{Template:FileName|mapserverproject.qgs}} we just created | ||
| + | (see Figure [[#fig:mapserver_export_dialog|57]]): | ||
| + | |||
| + | <ol> | ||
| + | <li> Start the MapServer dialog (see | ||
| + | Figure [[#fig:mapserver_export_dialog|57]]) by clicking the {{Template:ToolBtnTwo|mapserver_export|MapServer Export}} icon in the toolbar menu. | ||
| + | <li>Enter the name (e.g., {{Template:FileName|qgisproject.map}}) for your new map file. | ||
| + | <li>Browse and find the QGIS project file (e.g., {{Template:FileName|mapserverproject.qgs}}) | ||
| + | you previously saved. | ||
| + | <li>Enter a name (e.g., {{Template:FileName|MyMap}}) for the map. | ||
| + | <li>Enter the width and height (e.g., {{Template:FileName|600}} for the width and {{Template:FileName|400}} for the height) for your output image. | ||
| + | <li>For this example, the layers are in meters, so we change the units to meters. | ||
| + | <li>Choose ``png'' for the image type. | ||
| + | <li>Click {{Template:Button|OK}} to generate the new map file {{Template:FileName|qgisproject.map}}. | ||
| + | QGIS displays the success of your efforts. | ||
| + | </ol> | ||
| + | |||
| + | You can view the map file in any text editor or visualizer. If you | ||
| + | take a look, you'll notice that the export tool adds the metadata needed | ||
| + | to enable our map file for WMS. | ||
| + | |||
| + | ==== Testing the Map File ==== | ||
| + | |||
| + | We can now test our work using the {{Template:FileName|shp2img}} tool to create an image | ||
| + | from the map file. The {{Template:FileName|shp2img}} utility is part of MapServer and FWTools. | ||
| + | To create an image from our map: | ||
| + | |||
| + | <ul> | ||
| + | <li>Open a terminal window | ||
| + | <li>If you didn't save your map file in your home directory, change to | ||
| + | the folder where you saved it. | ||
| + | <li>Run {{Template:FileName|shp2img -m qgisproject.map -o mapserver_test.png}} and | ||
| + | display the image | ||
| + | </ul> | ||
| + | |||
| + | This creates a PNG with all the layers included in the QGIS project file. | ||
| + | In addition, the extent of the PNG will be the same as when we saved the | ||
| + | project. As you can see in Figure [[#fig:mapserver_export_test|58]], all | ||
| + | information except the airport symbols are included. | ||
| + | |||
| + | <table align='center'> | ||
| + | <caption>'''図 58:''' Test PNG created by shp2img with all MapServer Export layers {{Template:Nix}}</caption> | ||
| + | <tr><td> | ||
| + | <span id='fig:mapserver_export_test'></span> | ||
| + | [[File:mapserver_export_test.png|454px]]</td></tr></table> | ||
| + | |||
| + | If you plan to use the map file to serve WMS requests, you probably don't | ||
| + | have to tweak anything. If you plan to use it with a mapping template or a | ||
| + | custom interface, you may have a bit of manual work to do. To see how easy | ||
| + | it is to go from QGIS to serving maps on the web, take a look at | ||
| + | Christopher Schmidt's 5 minute flash video. He used an older version of QGIS (version 0.8), but the demo applies equally well to newer versions. | ||
| + | <ref>{{Template:URL|http://openlayers.org/presentations/mappingyourdata/}}</ref> | ||
| + | |||
| + | ---- | ||
| + | <references/> | ||
2009年10月5日 (月) 23:06時点における最新版
目次
MapServer Export Plugin
You can use QGIS to "compose" your map by adding and arranging layers, symbolizing them, customizing the colors and then creating a map file for MapServer.
Creating the Project File
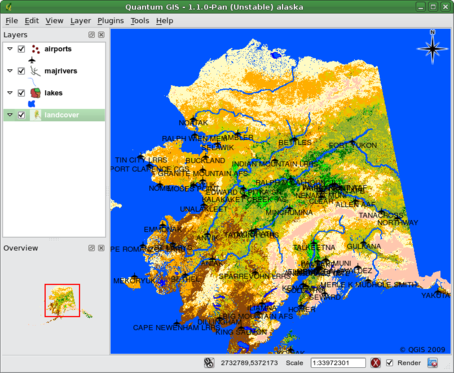
The MapServer Export Plugin operates on a saved QGIS project file and not on the current contents of the map canvas and legend. This has been a source of confusion for a number of users. As described below, before you start using the MapServer Export Plugin, you need to arrange the raster and vector layers you want to use in MapServer and save this status in a QGIS project file.
|
 |
In this example, we demonstrate the four steps required to create a simple project file which can be used to create the MapServer map file. We use raster and vector files from the QGIS sample dataset label_sampledata.
- Add the raster layer landcover.tif clicking on the
 Add Raster Layer icon.
- Add the vector Shapefiles lakes.shp, majrivers.shp and
airports.shp from the QGIS sample dataset clicking on the
 Add Vector Layer icon.
- Change the colors and symbolize the data as you like (For example see Figure 57)
- Save a new project named mapserverproject.qgs using
File >
 Save Project.
Creating the Map File
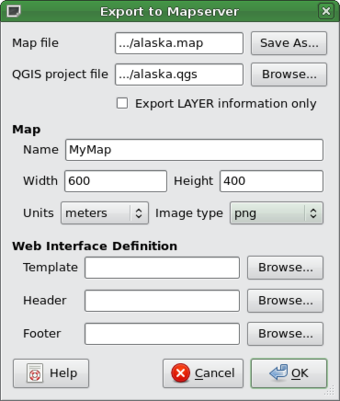
The tool msexport to export a QGIS project file to a MapServer map file is installed in your QGIS binary directory and can be used independently of QGIS. To use it from within QGIS, you need to enable the MapServer Export Plugin first using the Plugin Manager (see Section sec:load_core_plugin).
|
 |
- Map file
- Enter the name for the map file to be created. You can use the button at the right to browse for the directory where you want the map file created.
- Qgis project file
- Enter the full path to the QGIS project file (.qgs) you want to export. You can use the button at the right to browse for the QGIS project file.
- Map Name
- A name for the map. This name is prefixed to all images generated by the mapserver.
- Map Width
- Width of the output image in pixels.
- Map Height
- Height of the output image in pixels.
- Map Units
- Units of measure used for output
- Image type
- Format for the output image generated by MapServer
- Web Template
- Full path to the MapServer template file to be used with the map file
- Web Header
- Full path to the MapServer header file to be used with the map file
- Web Footer
- Full path to the MapServer footer file to be used with the map file
Only the Map file and QGIS project file inputs are required to create a map file, however by omitting the other parameters, you may end up creating a non-functional map file, depending on your intended use. Although QGIS is good at creating a map file from your project file, it may require some tweaking to get the results you want. For this example, we will create a map file using the project file mapserverproject.qgs we just created (see Figure 57):
- Start the MapServer dialog (see
Figure 57) by clicking the
 MapServer Export icon in the toolbar menu.
- Enter the name (e.g., qgisproject.map) for your new map file.
- Browse and find the QGIS project file (e.g., mapserverproject.qgs) you previously saved.
- Enter a name (e.g., MyMap) for the map.
- Enter the width and height (e.g., 600 for the width and 400 for the height) for your output image.
- For this example, the layers are in meters, so we change the units to meters.
- Choose ``png for the image type.
- Click OK to generate the new map file qgisproject.map. QGIS displays the success of your efforts.
You can view the map file in any text editor or visualizer. If you take a look, you'll notice that the export tool adds the metadata needed to enable our map file for WMS.
Testing the Map File
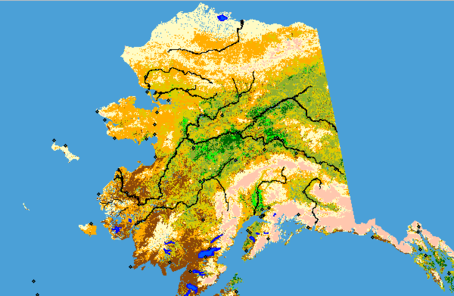
We can now test our work using the shp2img tool to create an image from the map file. The shp2img utility is part of MapServer and FWTools. To create an image from our map:
- Open a terminal window
- If you didn't save your map file in your home directory, change to the folder where you saved it.
- Run shp2img -m qgisproject.map -o mapserver_test.png and display the image
This creates a PNG with all the layers included in the QGIS project file. In addition, the extent of the PNG will be the same as when we saved the project. As you can see in Figure 58, all information except the airport symbols are included.
|
 |
If you plan to use the map file to serve WMS requests, you probably don't have to tweak anything. If you plan to use it with a mapping template or a custom interface, you may have a bit of manual work to do. To see how easy it is to go from QGIS to serving maps on the web, take a look at Christopher Schmidt's 5 minute flash video. He used an older version of QGIS (version 0.8), but the demo applies equally well to newer versions. <ref>http://openlayers.org/presentations/mappingyourdata/ </ref>
<references/>