「Print composer」の版間の差分
(タグ・画像調整前に一旦配下を統合) |
(タグ一括置換状態で一旦保存) |
||
| 行1: | 行1: | ||
| − | + | == Print Composer == | |
| − | Print Composer | + | <span id='label_printcomposer'></span> |
| − | </ | + | |
| − | |||
The print composer provides growing layout and printing | The print composer provides growing layout and printing | ||
capabilities. It allows you to add elements such as the QGIS map canvas, | capabilities. It allows you to add elements such as the QGIS map canvas, | ||
| 行9: | 行7: | ||
align and position each element and adjust the properties to create your | align and position each element and adjust the properties to create your | ||
layout. The layout can be printed (also to Postscript and PDF), exported to | layout. The layout can be printed (also to Postscript and PDF), exported to | ||
| − | image formats or to SVG | + | image formats or to SVG <ref>Export to SVG supported, but it |
| + | is not working properly with some recent QT4 versions. You should try and | ||
| + | check individual on your system</ref> | ||
| + | and you can save the layout as template and | ||
load it again in another session. See a list of tools in | load it again in another session. See a list of tools in | ||
| − | table | + | table~[[tab:printcomposer_tools]]: |
| − | < | + | <table border='1' aligh='center'><caption>'''Table xx:''' Print Composer Tools</caption><span id='tab:printcomposer_tools'></span> |
| − | < | + | <!-- {|l|p{6.9cm}|l|p{6.9cm}|} --> |
| − | < | + | <tr><td> '''Icon''' <td> '''Purpose''' <td> '''Icon''' <td> |
| + | '''Purpose''' </tr> | ||
| + | <tr><td> [[File:mActionFolder.png|26px]] | ||
| + | <td> Load from template <td> | ||
| + | [[File:mActionFileSaveAs.png|26px]] <td> Save as template </tr> | ||
| + | <tr><td> [[File:mActionExportMapServer.png|26px]] | ||
| + | <td> Export to an image format <td> | ||
| + | [[File:mActionSaveAsSVG.png|26px]] <td> Export print composition | ||
| + | to SVG </tr> | ||
| + | <tr><td> [[File:mActionFilePrint.png|26px]] <td> Print or | ||
| + | export as PDF or Postscript <td> | ||
| + | [[File:mActionZoomFullExtent.png|26px]] <td> Zoom to | ||
| + | full extend </tr> | ||
| + | <tr><td> [[File:mActionZoomIn.png|26px]] <td> Zoom in <td> | ||
| + | [[File:mActionZoomOut.png|26px]] <td> Zoom out </tr> | ||
| + | <tr><td> [[File:mActionDraw.png|26px]] <td> Refresh | ||
| + | view <td> | ||
| + | [[File:mActionAddRasterLayer.png|26px]] <td> Add | ||
| + | new map from QGIS map canvas </tr> | ||
| + | <tr><td> [[File:mActionSaveMapAsImage.png|26px]] <td> Add Image to | ||
| + | print composition <td> | ||
| + | [[File:mActionLabel.png|26px]] <td> Add label to print composition </tr> | ||
| + | <tr><td> [[File:mActionAddLegend.png|26px]] <td> Add new legend to | ||
| + | print composition <td> | ||
| + | [[File:mActionScaleBar.png|26px]] <td> Add new scalebar to print | ||
| + | composition</tr> | ||
| + | <tr><td> [[File:mActionSelectPan.png|26px]] <td> Select/Move item in | ||
| + | print composition <td> | ||
| + | [[File:mActionMoveItemContent.png|26px]] <td> Move content within | ||
| + | an item </tr> | ||
| + | <tr><td> [[File:mActionGroupItems.png|26px]] <td> Group items of | ||
| + | print composition <td> | ||
| + | [[File:mActionUngroupItems.png|26px]] <td> Ungroup items of print | ||
| + | composition </tr> | ||
| + | <tr><td> [[File:mActionRaiseItems.png|26px]] <td> Raise selected | ||
| + | items <td> | ||
| + | [[File:mActionLowerItems.png|26px]] <td> Lower selected items </tr> | ||
| + | <tr><td> [[File:mActionMoveItemsToTop.png|26px]] <td> Move selected | ||
| + | items to top <td> | ||
| + | [[File:mActionMoveItemsToBottom.png|26px]] <td> Move selected | ||
| + | items to bottom </tr> | ||
| + | <tr><td> [[File:mActionAlignLeft.png|26px]] <td> Align selected | ||
| + | items left <td> | ||
| + | [[File:mActionAlignRight.png|26px]] <td> Align selected items | ||
| + | right </tr> | ||
| + | <tr><td> [[File:mActionAlignHCenter.png|26px]] <td> Align selected | ||
| + | items center <td> | ||
| + | [[File:mActionAlignVCenter.png|26px]] <td> Align selected items | ||
| + | center vertical </tr> | ||
| + | <tr><td> [[File:mActionAlignTop.png|26px]] <td> Align selected | ||
| + | items top <td> | ||
| + | [[File:mActionAlignBottom.png|26px]] <td> Align selected | ||
| + | items bottom </tr> | ||
| + | </table> | ||
| − | + | To access the print composer, click on the {{Template:ToolBtnTwo|mActionFilePrint|Print}} | |
| + | button in the toolbar or choose {{Template:MainMenuOpt|File}} > {{Template:DropMenuOptTwo|mActionFilePrint|Print Composer}}. | ||
| − | + | === Using Print Composer === | |
| − | + | <span id='label_useprintcomposer'></span> | |
| − | + | ||
| − | + | ||
| − | + | ||
| − | + | ||
| − | + | ||
| − | + | ||
| − | + | ||
| − | + | ||
| − | + | ||
| − | + | ||
| − | + | ||
| − | + | ||
| − | + | ||
| − | + | ||
| − | + | ||
| − | + | ||
| − | + | ||
| − | + | ||
| − | + | ||
| − | + | ||
| − | + | ||
| − | + | ||
| − | + | ||
| − | + | ||
| − | + | ||
| − | + | ||
| − | + | ||
| − | + | ||
| − | + | ||
| − | + | ||
| − | + | ||
| − | + | ||
| − | + | ||
| − | + | ||
| − | + | ||
| − | + | ||
| − | + | ||
| − | + | ||
| − | + | ||
| − | + | ||
| − | + | ||
| − | + | ||
| − | + | ||
| − | + | ||
| − | + | ||
| − | + | ||
| − | + | ||
| − | + | ||
| − | + | ||
| − | + | ||
| − | + | ||
| − | + | ||
| − | + | ||
| − | + | ||
| − | + | ||
| − | + | ||
| − | + | ||
| − | + | ||
| − | + | ||
| − | + | ||
| − | + | ||
| − | + | ||
| − | + | ||
| − | + | ||
| − | + | ||
| − | + | ||
| − | + | ||
| − | + | ||
| − | + | ||
| − | + | ||
| − | + | ||
| − | + | ||
| − | + | ||
| − | + | ||
| − | + | ||
| − | + | ||
| − | + | ||
| − | + | ||
| − | + | ||
| − | + | ||
| − | + | ||
| − | + | ||
| − | + | ||
| − | + | ||
| − | + | ||
| − | + | ||
| − | + | ||
| − | + | ||
| − | + | ||
| − | + | ||
| − | + | ||
| − | + | ||
| − | + | ||
| − | + | ||
| − | + | ||
| − | + | ||
| − | + | ||
| − | + | ||
| − | + | ||
| − | + | ||
| − | + | ||
| − | + | ||
| − | + | ||
| − | + | ||
| − | + | ||
| − | + | ||
| − | + | ||
| − | + | ||
| − | + | ||
| − | + | ||
| − | + | ||
| − | + | ||
| − | + | ||
| − | + | ||
| − | + | ||
| − | + | ||
| − | + | ||
| − | + | ||
| − | + | ||
| − | + | ||
| − | + | ||
| − | + | ||
| − | + | ||
| − | + | ||
| − | + | ||
| − | + | ||
| − | + | ||
| − | + | ||
| − | + | ||
| − | + | ||
| − | + | ||
| − | + | ||
| − | + | ||
| − | + | ||
| − | + | ||
Before you start to work with the print composer, you need to load some | Before you start to work with the print composer, you need to load some | ||
raster and vector layers in the QGIS map canvas and adapt their properties | raster and vector layers in the QGIS map canvas and adapt their properties | ||
to suite your own convinience. After everything is rendered and symbolized to | to suite your own convinience. After everything is rendered and symbolized to | ||
| − | your liking you click the | + | your liking you click the {{Template:ToolBtnTwo|mActionFilePrint|Print Composer}} icon. |
| − | + | ||
| − | + | ||
| − | + | ||
| − | + | ||
| − | + | ||
| − | + | ||
| − | + | ||
| − | + | ||
| − | + | ||
| − | + | ||
| − | + | ||
| − | + | ||
| − | < | + | <table align='center'> |
| − | </ | + | <caption>'''Figure xx:''' Print Composer {{Template:Nix</caption> |
| − | </ | + | <tr><td>}caption}<span id='fig:print_composer_blank'></span> |
| + | [[File:print_composer_blank.png|740px]]</td></tr></table> | ||
| − | |||
Opening the print composer provides you with a blank canvas to which you can | Opening the print composer provides you with a blank canvas to which you can | ||
add the current QGIS map canvas, legend, scalebar, images and text. Figure | add the current QGIS map canvas, legend, scalebar, images and text. Figure | ||
| − | + | [[fig:print_composer_blank]] shows the initial view of the print composer | |
| − | with an activated Snap to grid modus but before any elements are | + | with an activated {{Template:CheckBox|Snap to grid}} modus but before any elements are |
added. The print composer provides two tabs: | added. The print composer provides two tabs: | ||
| − | < | + | <ul> |
| − | + | <li>The {{Template:Tab|General}} tab allows you to set paper size, orientation, the | |
| − | + | ||
| − | < | + | |
print quality for the output file in dpi and to activate snapping to a grid | print quality for the output file in dpi and to activate snapping to a grid | ||
| − | of a defined resolution. Please note, the Snap to grid feature | + | of a defined resolution. Please note, the {{Template:CheckBox|Snap to grid}} feature |
| − | only works, if you define a grid resolution | + | only works, if you define a grid resolution > 0. Furthermore you can also |
| − | activate the Print as raster checkbox. This means all elements | + | activate the {{Template:CheckBox|Print as raster}} checkbox. This means all elements |
will be rastered before printing or saving as Postscript of PDF. | will be rastered before printing or saving as Postscript of PDF. | ||
| − | < | + | <li>The {{Template:Tab|Item}} tab displays the properties for the selected map element. |
| − | + | Click the {{Template:ToolBtnTwo|mActionSelectPan|Select/Move item}} | |
| − | Click the | + | |
icon to select an element (e.g. legend, scalebar or label) on the canvas. | icon to select an element (e.g. legend, scalebar or label) on the canvas. | ||
Then click the Item tab and customize the settings for the selected | Then click the Item tab and customize the settings for the selected | ||
element. | element. | ||
| − | </ | + | </ul> |
| − | + | ||
| − | |||
You can add multiple elements to the composer. It is also possible to have | You can add multiple elements to the composer. It is also possible to have | ||
more than one map view or legend or scalebar in the print composer canvas. | more than one map view or legend or scalebar in the print composer canvas. | ||
| 行208: | 行111: | ||
extent. | extent. | ||
| − | + | ==== Adding a current QGIS map canvas to the Print Composer ==== | |
| − | + | ||
| − | + | To add the QGIS map canvas, click on the {{Template:ToolBtnTwo|mActionAddRasterLayer|Add new map | |
| − | + | from QGIS map canvas}} button in the print composer toolbar and drag a | |
| − | + | ||
| − | + | ||
| − | + | ||
| − | + | ||
| − | To add the QGIS map canvas, click on the | + | |
| − | from QGIS map canvas button in the print composer toolbar and drag a | + | |
rectangle on the composer canvas with the left mouse button to add the map. | rectangle on the composer canvas with the left mouse button to add the map. | ||
| − | You will see an empty box with a | + | You will see an empty box with a ''"Map will be printed here"'' message. |
To display the current map, you can choose between three different modes in | To display the current map, you can choose between three different modes in | ||
| − | the map Item tab: | + | the map {{Template:Tab|Item}} tab: |
| − | + | ||
| − | + | ||
| − | < | + | <ul> |
| − | < | + | <li>{{Template:SelectString|Preview|Rectangle}} is the default setting. It only |
| − | displays an empty box with a message | + | displays an empty box with a message ''"Map will be printed here"''. |
| − | < | + | <li>{{Template:SelectString|Preview|Cache}} renders the map in the current screen |
| − | + | ||
resolution. If case you zoom in or out the composer window, the map is not | resolution. If case you zoom in or out the composer window, the map is not | ||
rendered again but the image will be scaled. | rendered again but the image will be scaled. | ||
| − | < | + | <li>{{Template:SelectString|Preview|Render}} means, that if you zoom in or out the |
| − | + | ||
composer window, the map will be rendered again, but for space reasons, only | composer window, the map will be rendered again, but for space reasons, only | ||
up to a maximum resolution. | up to a maximum resolution. | ||
| − | </ | + | </ul> |
| − | + | ||
| − | < | + | <table align='center'> |
| + | <caption>'''Figure xx:''' Print Composer map item tab content {{Template:Nix</caption> | ||
| + | <tr><td>}caption}<span id='fig:print_composer_map_item'></span> | ||
| + | <table align='center'><caption align='bottom'>(x) Width, height and extend dialog</caption><tr><td><span id='subfig:print_composer_map_item1'></span>[[File:print_composer_map_item1.png|296px]]</td></tr></table> | ||
| + | <table align='center'><caption align='bottom'>(x) Properties dialog</caption><tr><td><span id='subfig:print_composer_map_item2'></span>[[File:print_composer_map_item2.png|296px]]</td></tr></table> | ||
| + | </td></tr></table> | ||
| − | + | You can resize the map later by clicking on the {{Template:ToolBtnTwo|mActionSelectPan|Select/Move item}} | |
| − | + | ||
| − | + | ||
| − | + | ||
| − | + | ||
| − | + | ||
| − | + | ||
| − | + | ||
| − | + | ||
| − | + | ||
| − | + | ||
| − | + | ||
| − | + | ||
| − | You can resize the map later by clicking on the | + | |
button, selecting the element, and dragging one of the blue handles in the corner of the map. With the | button, selecting the element, and dragging one of the blue handles in the corner of the map. With the | ||
| − | map selected, you can now adapt more properties in the map Item tab. Resize the map | + | map selected, you can now adapt more properties in the map {{Template:Tab|Item}} tab. Resize the map |
item specifying the width and height or the scale. Define the map extend using Y and | item specifying the width and height or the scale. Define the map extend using Y and | ||
| − | X min/max values or clicking the set to map canvas extend button. Update the | + | X min/max values or clicking the {{Template:Button|set to map canvas extend}} button. Update the |
map preview and select, whether to see a preview from cache or an empty rectangle with | map preview and select, whether to see a preview from cache or an empty rectangle with | ||
| − | a | + | a ''"Map will be printed here"'' message. Define colors and outline width for the |
element frame, set a background color and opacity for the map canvas. And you can also | element frame, set a background color and opacity for the map canvas. And you can also | ||
| − | select or unselect to display an element frame with the frame checkbox | + | select or unselect to display an element frame with the {{Template:CheckBox|frame}} checkbox |
| − | (see Figure | + | (see Figure~[[fig:print_composer_map_item]]). If you change the view on the QGIS |
map canvas by zooming or panning or changing vector or raster properties, you can | map canvas by zooming or panning or changing vector or raster properties, you can | ||
update the print composer view selecting the map element in the print composer and clicking | update the print composer view selecting the map element in the print composer and clicking | ||
| − | the Update Preview button in the map Item tab | + | the {{Template:Button|Update Preview}} button in the map {{Template:Tab|Item}} tab |
| − | (see Figure | + | (see Figure~[[fig:print_composer_map_item]]). |
| − | |||
To move layers within the map element select the map element, click | To move layers within the map element select the map element, click | ||
| − | the | + | the {{Template:ToolBtnTwo|mActionMoveItemContent|Move item content}} icon |
and move the layers within the map element frame with the left mouse button. | and move the layers within the map element frame with the left mouse button. | ||
| − | + | ==== Navigation tools ==== | |
| − | |||
| − | |||
| − | |||
| − | |||
| − | |||
| − | |||
| − | |||
| − | |||
| − | |||
| − | |||
| − | |||
| − | |||
| − | |||
| − | |||
| − | |||
| − | |||
| − | |||
| − | |||
| − | |||
| − | |||
| − | |||
| − | |||
For map navigation the print composer provides 4 general tools: | For map navigation the print composer provides 4 general tools: | ||
| − | < | + | <ul> |
| − | + | <li>{{Template:ToolBtnTwo|mActionZoomOut|Zoom in}}, | |
| − | < | + | <li>{{Template:ToolBtnTwo|mActionZoomOut|Zoom out}}, |
| − | + | <li>{{Template:ToolBtnTwo|mActionZoomFullExtent|Zoom to full extend}} and | |
| − | < | + | <li>{{Template:ToolBtnTwo|mActionDraw|Refresh the view}}, if you find the view in an |
| − | + | ||
| − | < | + | |
| − | + | ||
| − | < | + | |
| − | + | ||
inconsistent state. | inconsistent state. | ||
| − | </ | + | </ul> |
| − | + | ||
| − | |||
| − | + | ==== Adding other elements to the Print Composer ==== | |
| − | Adding other elements to the Print Composer | + | |
| − | + | ||
| − | + | ||
| − | + | ||
Besides adding a current QGIS map canvas to the Print Composer, it is also possible | Besides adding a current QGIS map canvas to the Print Composer, it is also possible | ||
to add, position, move and customize legend, scalebar, images and label elements. | to add, position, move and customize legend, scalebar, images and label elements. | ||
| − | + | ===== Label and images ===== | |
| − | Label and images | + | |
| − | + | To add a label or an image, click the {{Template:ToolBtnTwo|mActionLabel|Add label}} or | |
| − | To add a label or an image, click the | + | {{Template:ToolBtnTwo|mActionSaveMapAsImage|Add image}} icon, place the element with |
| − | + | ||
the left mouse button on the print composer canvas and position and customize | the left mouse button on the print composer canvas and position and customize | ||
| − | their appearance in the Item tab. | + | their appearance in the {{Template:Tab|Item}} tab. |
| − | < | + | <table align='center'> |
| + | <caption>'''Figure xx:''' Customize print composer label and images {{Template:Nix</caption> | ||
| + | <tr><td>}caption}<span id='fig:print_composer_tab2'></span> | ||
| + | <table align='center'><caption align='bottom'>(x) label item tab</caption><tr><td><span id='subfig:print_composer_label_item'></span>[[File:print_composer_label_item.png|296px]]</td></tr></table> | ||
| + | <table align='center'><caption align='bottom'>(x) image item tab</caption><tr><td><span id='subfig:print_composer_image_item'></span>[[File:print_composer_image_item.png|296px]]</td></tr></table> | ||
| + | </td></tr></table> | ||
| − | + | ===== Legend and scalebar ===== | |
| − | + | ||
| − | + | ||
| − | + | ||
| − | + | ||
| − | + | ||
| − | + | To add a map legend or a scalebar, click the {{Template:ToolBtnTwo|mActionAddLegend|Add new legend}} or | |
| − | + | {{Template:ToolBtnTwo|mActionScaleBar|Add new scalebar}} icon, place the element with the left | |
| − | + | mouse button on the print composer canvas and position and customize their appearance in the {{Template:Tab|Item}} tab. | |
| − | + | ||
| − | < | + | <table align='center'> |
| − | + | <caption>'''Figure xx:''' Customize print composer legend and scalebar {{Template:Nix</caption> | |
| + | <tr><td>}caption}<span id='fig:print_composer_tab1'></span> | ||
| + | <table align='center'><caption align='bottom'>(x) legend item tab</caption><tr><td><span id='subfig:print_composer_legend_item'></span>[[File:print_composer_legend_item.png|296px]]</td></tr></table> | ||
| + | <table align='center'><caption align='bottom'>(x) scalebar item tab</caption><tr><td><span id='subfig:print_composer_scalebar_item'></span>[[File:print_composer_scalebar_item.png|296px]]</td></tr></table> | ||
| + | </td></tr></table> | ||
| − | + | ==== Raise, lower and align elements ==== | |
| − | + | ||
| − | + | ||
| − | + | ||
| − | |||
| − | |||
| − | |||
| − | |||
| − | |||
| − | |||
| − | |||
| − | |||
| − | |||
| − | |||
| − | |||
| − | |||
| − | |||
| − | |||
| − | |||
| − | |||
| − | |||
| − | |||
| − | |||
| − | |||
| − | |||
Raise or lower functionalities for elements are inside the | Raise or lower functionalities for elements are inside the | ||
| − | + | {{Template:ToolBtnTwo|mActionRaiseItems|Raise selected items}} pulldown menu. Choose an | |
element on the print composer canvas and select the matching functionality to | element on the print composer canvas and select the matching functionality to | ||
raise or lower the selected element compared to the other elements (see | raise or lower the selected element compared to the other elements (see | ||
| − | table | + | table~[[tab:printcomposer_tools]]). |
| − | |||
There are several alignment functionalities available within the | There are several alignment functionalities available within the | ||
| − | + | {{Template:ToolBtnTwo|mActionAlignLeft|Align selected items}} pulldown menu (see | |
| − | table | + | table~[[tab:printcomposer_tools]]). To use an alignment functionality , you |
first select some elements and then click on the matching alignment icon. All | first select some elements and then click on the matching alignment icon. All | ||
selected will then be aligned within to their common bounding box. | selected will then be aligned within to their common bounding box. | ||
| − | + | ==== Creating Output ==== | |
| − | + | Figure [[fig:print_composer_complete]] shows the print composer with an example | |
| − | + | ||
| − | + | ||
| − | + | ||
| − | + | ||
| − | Figure | + | |
print layout including each type of map element described in the sections above. | print layout including each type of map element described in the sections above. | ||
| − | < | + | <table align='center'> |
| + | <caption>'''Figure xx:''' Print Composer with map view, legend, scalebar, and text added {{Template:Nix</caption> | ||
| + | <tr><td>}caption} | ||
| + | <span id='fig:print_composer_complete'></span> | ||
| + | [[File:print_composer_complete.png|740px]]</td></tr></table> | ||
| − | |||
| − | |||
| − | |||
| − | |||
| − | |||
| − | |||
| − | |||
| − | |||
| − | |||
| − | |||
| − | |||
| − | |||
| − | |||
| − | |||
| − | |||
The print composer allows you to create several output formats and it is possible to | The print composer allows you to create several output formats and it is possible to | ||
define the resolution (print quality) and paper size: | define the resolution (print quality) and paper size: | ||
| − | < | + | <ul> |
| − | + | <li>The {{Template:ToolBtnTwo|mActionFilePrint|Print}} icon allows to print the layout | |
| − | + | ||
| − | < | + | |
to a connected printer or as PDF or Postscript file depending on installed printer | to a connected printer or as PDF or Postscript file depending on installed printer | ||
drivers. | drivers. | ||
| − | < | + | <li>The {{Template:ToolBtnTwo|mActionExportMapServer|Export as image}} icon exports the |
| − | + | ||
composer canvas in several image formats such as PNG, BPM, TIF, JPG, ... | composer canvas in several image formats such as PNG, BPM, TIF, JPG, ... | ||
| − | < | + | <li>The {{Template:ToolBtnTwo|mActionSaveAsSVG|Export as SVG}} icon saves the print |
| − | + | composer canvas as a SVG (Scalable Vector Graphic). '''Note:''' Currently the | |
| − | composer canvas as a SVG (Scalable Vector Graphic). | + | |
SVG output is very basic. This is not a QGIS problem, but a problem of the underlaying | SVG output is very basic. This is not a QGIS problem, but a problem of the underlaying | ||
Qt library. This will hopefully be sorted out in future versions. | Qt library. This will hopefully be sorted out in future versions. | ||
| − | </ | + | </ul> |
| − | + | ||
| − | + | ==== Saving and loading a print composer layout ==== | |
| − | Saving and loading a print composer layout | + | |
| − | + | ||
| − | + | With the {{Template:ToolBtnTwo|mActionFileSaveAs|Save as template}} and | |
| − | With the | + | {{Template:ToolBtnTwo|mActionFolder|Load from template}} icons you can save the current |
| − | + | ||
state of a print composer session as a *.qpt template and load the template | state of a print composer session as a *.qpt template and load the template | ||
again in another session. | again in another session. | ||
2009年10月5日 (月) 01:04時点における版
Print Composer
The print composer provides growing layout and printing capabilities. It allows you to add elements such as the QGIS map canvas, legend, scalebar, images, and text labels. You can size, group align and position each element and adjust the properties to create your layout. The layout can be printed (also to Postscript and PDF), exported to image formats or to SVG <ref>Export to SVG supported, but it is not working properly with some recent QT4 versions. You should try and check individual on your system</ref> and you can save the layout as template and load it again in another session. See a list of tools in table~tab:printcomposer_tools:
To access the print composer, click on the ![]() Print
button in the toolbar or choose File >
Print
button in the toolbar or choose File > ![]() Print Composer.
Print Composer.
Using Print Composer
Before you start to work with the print composer, you need to load some
raster and vector layers in the QGIS map canvas and adapt their properties
to suite your own convinience. After everything is rendered and symbolized to
your liking you click the ![]() Print Composer icon.
Print Composer icon.
}caption}
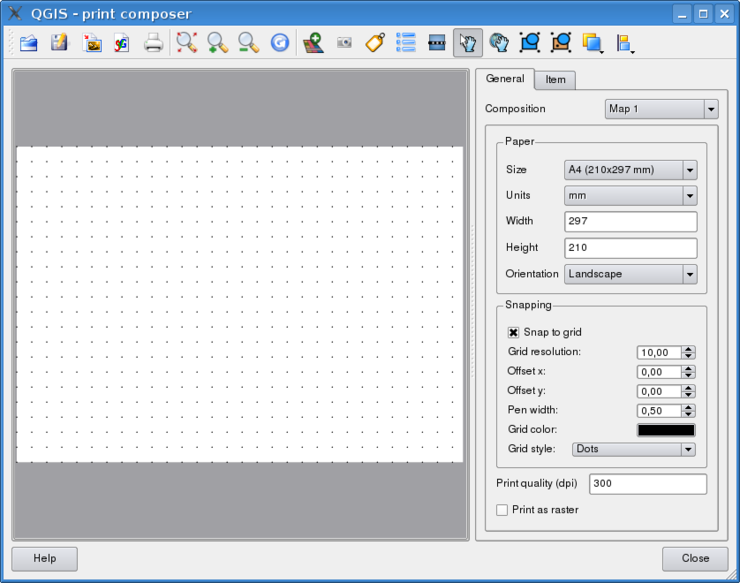 |
Opening the print composer provides you with a blank canvas to which you can
add the current QGIS map canvas, legend, scalebar, images and text. Figure
fig:print_composer_blank shows the initial view of the print composer
with an activated ![]() Snap to grid modus but before any elements are
added. The print composer provides two tabs:
Snap to grid modus but before any elements are
added. The print composer provides two tabs:
- The General tab allows you to set paper size, orientation, the
print quality for the output file in dpi and to activate snapping to a grid
of a defined resolution. Please note, the
 Snap to grid feature
only works, if you define a grid resolution > 0. Furthermore you can also
activate the
  Print as raster checkbox. This means all elements
will be rastered before printing or saving as Postscript of PDF.
- The Item tab displays the properties for the selected map element.
Click the
 Select/Move item
icon to select an element (e.g. legend, scalebar or label) on the canvas.
Then click the Item tab and customize the settings for the selected
element.
You can add multiple elements to the composer. It is also possible to have more than one map view or legend or scalebar in the print composer canvas. Each element has its own properties and in the case of the map, its own extent.
Adding a current QGIS map canvas to the Print Composer
To add the QGIS map canvas, click on the ![]() Add new map
from QGIS map canvas button in the print composer toolbar and drag a
rectangle on the composer canvas with the left mouse button to add the map.
You will see an empty box with a "Map will be printed here" message.
To display the current map, you can choose between three different modes in
the map Item tab:
Add new map
from QGIS map canvas button in the print composer toolbar and drag a
rectangle on the composer canvas with the left mouse button to add the map.
You will see an empty box with a "Map will be printed here" message.
To display the current map, you can choose between three different modes in
the map Item tab:
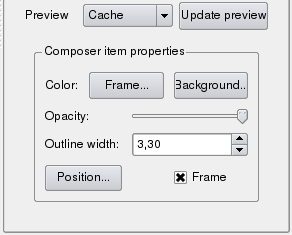
- Preview Rectangle
 is the default setting. It only
displays an empty box with a message "Map will be printed here".
- Preview Cache
 renders the map in the current screen
resolution. If case you zoom in or out the composer window, the map is not
rendered again but the image will be scaled.
- Preview Render
 means, that if you zoom in or out the
composer window, the map will be rendered again, but for space reasons, only
up to a maximum resolution.
}caption}
|
You can resize the map later by clicking on the ![]() Select/Move item
button, selecting the element, and dragging one of the blue handles in the corner of the map. With the
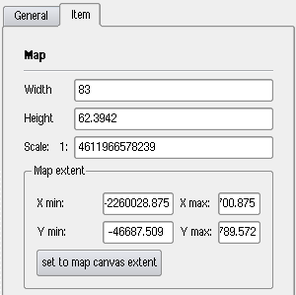
map selected, you can now adapt more properties in the map Item tab. Resize the map
item specifying the width and height or the scale. Define the map extend using Y and
X min/max values or clicking the set to map canvas extend button. Update the
map preview and select, whether to see a preview from cache or an empty rectangle with
a "Map will be printed here" message. Define colors and outline width for the
element frame, set a background color and opacity for the map canvas. And you can also
select or unselect to display an element frame with the
Select/Move item
button, selecting the element, and dragging one of the blue handles in the corner of the map. With the
map selected, you can now adapt more properties in the map Item tab. Resize the map
item specifying the width and height or the scale. Define the map extend using Y and
X min/max values or clicking the set to map canvas extend button. Update the
map preview and select, whether to see a preview from cache or an empty rectangle with
a "Map will be printed here" message. Define colors and outline width for the
element frame, set a background color and opacity for the map canvas. And you can also
select or unselect to display an element frame with the ![]() frame checkbox
(see Figure~fig:print_composer_map_item). If you change the view on the QGIS
map canvas by zooming or panning or changing vector or raster properties, you can
update the print composer view selecting the map element in the print composer and clicking
the Update Preview button in the map Item tab
(see Figure~fig:print_composer_map_item).
frame checkbox
(see Figure~fig:print_composer_map_item). If you change the view on the QGIS
map canvas by zooming or panning or changing vector or raster properties, you can
update the print composer view selecting the map element in the print composer and clicking
the Update Preview button in the map Item tab
(see Figure~fig:print_composer_map_item).
To move layers within the map element select the map element, click
the ![]() Move item content icon
and move the layers within the map element frame with the left mouse button.
Move item content icon
and move the layers within the map element frame with the left mouse button.
For map navigation the print composer provides 4 general tools:
 Zoom in,
 Zoom out,
 Zoom to full extend and
 Refresh the view, if you find the view in an
inconsistent state.
Adding other elements to the Print Composer
Besides adding a current QGIS map canvas to the Print Composer, it is also possible to add, position, move and customize legend, scalebar, images and label elements.
Label and images
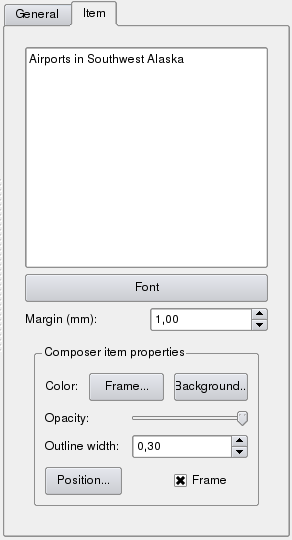
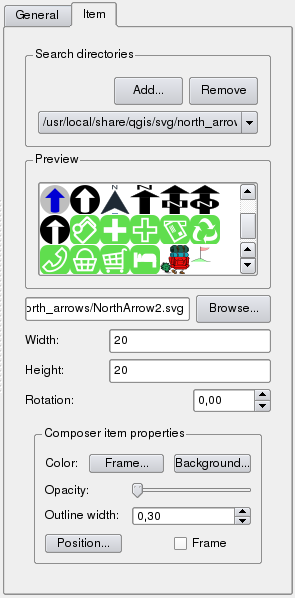
To add a label or an image, click the ![]() Add label or
Add label or
![]() Add image icon, place the element with
the left mouse button on the print composer canvas and position and customize
their appearance in the Item tab.
Add image icon, place the element with
the left mouse button on the print composer canvas and position and customize
their appearance in the Item tab.
}caption}
|
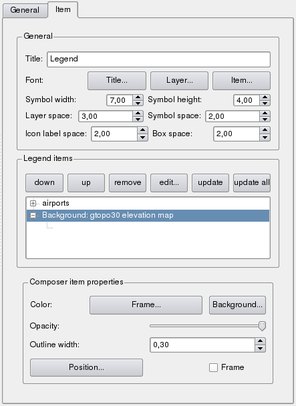
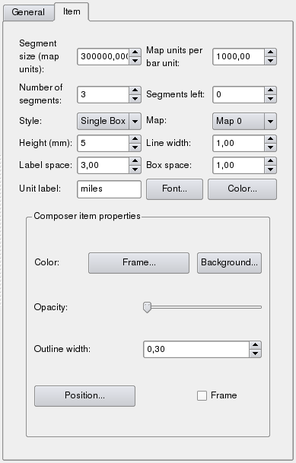
Legend and scalebar
To add a map legend or a scalebar, click the ![]() Add new legend or
Add new legend or
![]() Add new scalebar icon, place the element with the left
mouse button on the print composer canvas and position and customize their appearance in the Item tab.
Add new scalebar icon, place the element with the left
mouse button on the print composer canvas and position and customize their appearance in the Item tab.
}caption}
|
Raise, lower and align elements
Raise or lower functionalities for elements are inside the
![]() Raise selected items pulldown menu. Choose an
element on the print composer canvas and select the matching functionality to
raise or lower the selected element compared to the other elements (see
table~tab:printcomposer_tools).
Raise selected items pulldown menu. Choose an
element on the print composer canvas and select the matching functionality to
raise or lower the selected element compared to the other elements (see
table~tab:printcomposer_tools).
There are several alignment functionalities available within the
![]() Align selected items pulldown menu (see
table~tab:printcomposer_tools). To use an alignment functionality , you
first select some elements and then click on the matching alignment icon. All
selected will then be aligned within to their common bounding box.
Align selected items pulldown menu (see
table~tab:printcomposer_tools). To use an alignment functionality , you
first select some elements and then click on the matching alignment icon. All
selected will then be aligned within to their common bounding box.
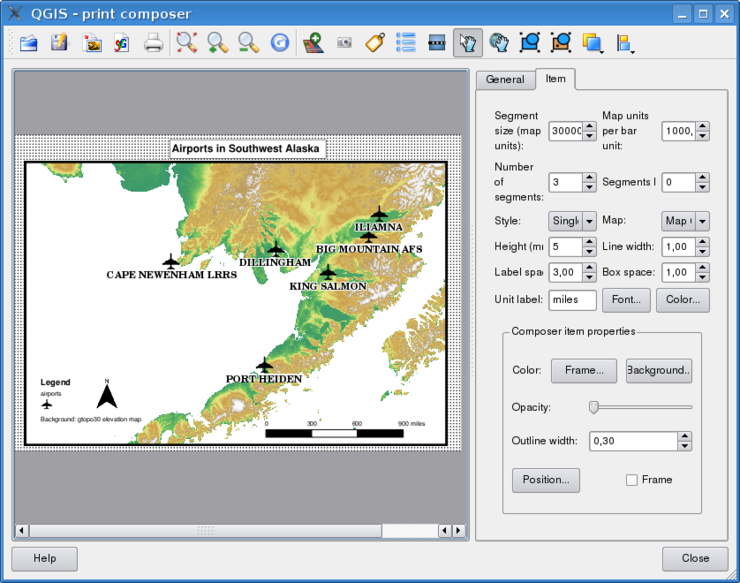
Creating Output
Figure fig:print_composer_complete shows the print composer with an example print layout including each type of map element described in the sections above.
}caption}
 |
The print composer allows you to create several output formats and it is possible to define the resolution (print quality) and paper size:
- The
 Print icon allows to print the layout
to a connected printer or as PDF or Postscript file depending on installed printer
drivers.
- The
 Export as image icon exports the
composer canvas in several image formats such as PNG, BPM, TIF, JPG, ...
- The
 Export as SVG icon saves the print
composer canvas as a SVG (Scalable Vector Graphic). Note: Currently the
SVG output is very basic. This is not a QGIS problem, but a problem of the underlaying
Qt library. This will hopefully be sorted out in future versions.
Saving and loading a print composer layout
With the ![]() Save as template and
Save as template and
![]() Load from template icons you can save the current
state of a print composer session as a *.qpt template and load the template
again in another session.
Load from template icons you can save the current
state of a print composer session as a *.qpt template and load the template
again in another session.
